Creating data with no-code backend REST API
In this step, we'll look at creating data via the the no-code backend REST API.
Go to TODOLISTS service, open the Lists model, and switch to the Integration tab.
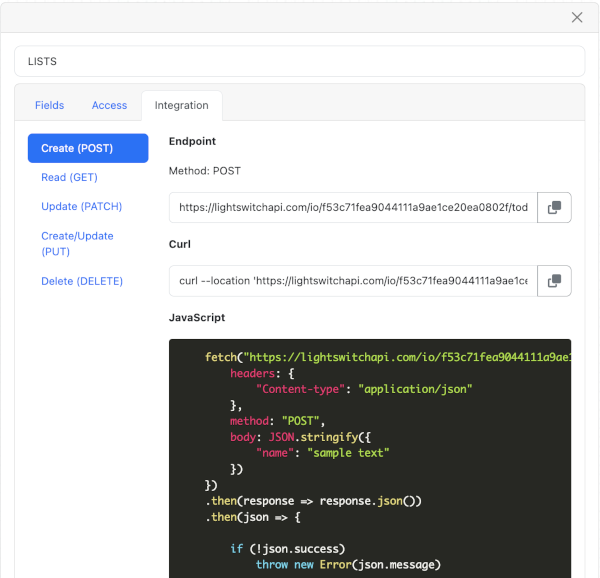
Copy JavaScript code from the Create (POST) tab.
Go back to sample code and open the file components/Lists/Lists.js. Locate the function addList().
    // Add List
    const addList = (newList) => {

    setLoading(true)
    setErrorMessage('')

    // ** INSERT CREATE CODE HERE **

    // ** INSERT CREATE CODE ENDS **
}
Paste the JavaScript code from earlier inside the marked area.
// Add List
const addList = (newList) => {

setLoading(true)
setErrorMessage('')

// ** INSERT CREATE CODE HERE **

fetch("[YOUR LIGHTSWITCH API ENDPOINT]", {
    headers: {
        "Authorization": "Bearer " + "/**** INSERT token.value HERE ****/",
        "Content-type": "application/json"
    },
    method: "POST",
    body: JSON.stringify({
        // REPLACE name: "sample string"
    })
})
.then(response => response.json())
.then(json => {

    if (!json.success)
        throw new Error(json.message)

    // handle response data
    // REPLACE console.log(json.data.id)

})
.catch((error) => {

    // handle error
    alert(error.message)

});

// ** INSERT CREATE CODE ENDS **
}
Update the Authorization header to include the authorization token. If you don't see the authorization header in sample code, make sure you've configured permissions as described in configuring permissions.
"Authorization": "Bearer " + auth.token?.value,
Change the request body to carry the newList variable.
    body: JSON.stringify(
       newList
    )
Update code to handle the response.
.then((json) => {

    // indicate that the action is complete
    setLoading(false)

    // if the request is not successful, throw an error with the returned message
    if (!json.success){
        throw new Error(json.message)
    }
    else
    {
        // update state to display returned values
        setLists([...lists, {...newList, id: json.data.id}])
    }
})
The final output should be something like this.
// Add List
const addList = (newList) => {
setLoading(true)
setErrorMessage('')
// ** INSERT CREATE CODE HERE **
fetch("[YOUR LIGHTSWITCH API ENDPOINT]", {
headers: {
// ***** UPDATED ***** //
"Authorization": "Bearer " + auth.token?.value,
"Content-type": "application/json"
},
method: "POST",
body: JSON.stringify(
newList
)
})
.then(response => response.json())
.then((json) => {
// ***** UPDATED ***** //
// indicate that the action is complete
setLoading(false)
if (!json.success){
throw new Error(json.message)
}
// ***** UPDATED ***** //
// update state to display returned values
setLists([...lists, {...newList, id: json.data.id}])
})
.catch((error) => {
// ***** UPDATED ***** //
// indicate that the action is complete
setLoading(false)
// handle error
alert(error.message)
});
// ** INSERT CREATE CODE ENDS **
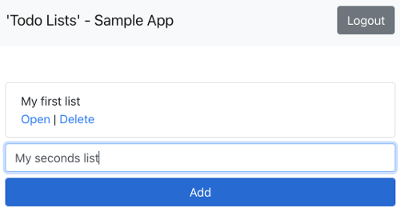
}Save your code. Now you should be able to create lists in the sample app.
Next, we'll look at retrieving saved lists.